Ductless mini split installation is having a moment. Prices on quality units have dropped enough that a single-zone mini split air conditioner installation now costs less than a decent window AC setup and the efficiency gap between the two is not even close. The appeal of doing it yourself is real – skip the $800 to $1,200 labor quote spend a weekend on it and you are done.
The problem is that mini split ac installation has one or two steps that are genuinely unforgiving. Do them wrong and the system runs fine for eight months then the compressor seizes and the warranty is void because the installation was not done to spec. This guide is about those steps specifically plus the smaller mistakes that add up to a system that under performs from day one.
A note from my experience which can be helpful, before we get into it: most of this applies equally to ductless air conditioner installation on any major brand – Mitsubishi Daikin Pioneer MRCOOL or Senville. The physics do not change brand to brand, some people have the misconception that it does.
1. Sizing by square footage alone
Every BTU calculator on the first page of Google asks for your square footage. That is a starting point not an answer. A 300 square foot room with nine foot ceilings south facing windows and no insulation in the walls needs a fundamentally different unit than a 300 square foot room that is shaded well insulated and in Minnesota.
The right tool is a Manual J load calculation. ACCA publishes the standard and several HVAC software tools will run it for free if you input your wall construction window dimensions and zip code. It takes 20 minutes and is worth every one of them.
Short cycling – what happens when a unit is oversized – is a compressor killer. The system hits setpoint fast shuts off the room warms up and it kicks on again. Repeat a few thousand times and you have a compressor that failed in 3 years instead of 15 years.
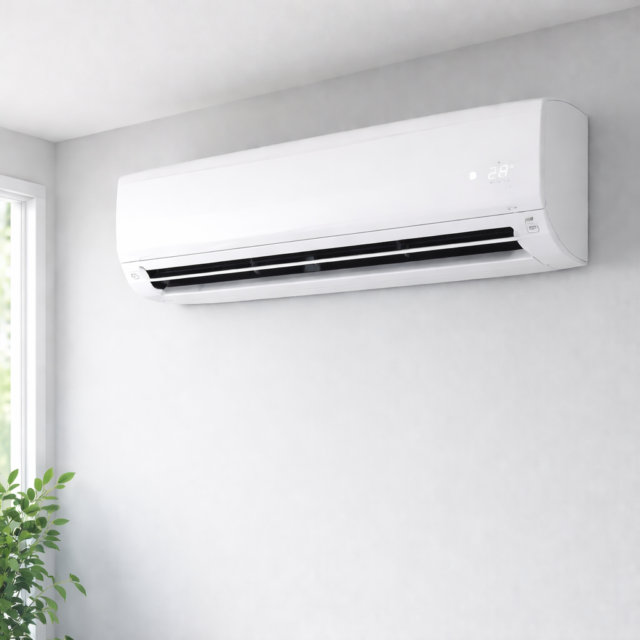
2. Mounting the indoor unit in the wrong place
Two rules that most installation guides mention briefly and then move on from:First the indoor head needs at least eight inches of clear space on the sides and top. Not approximately eight inches – actually eight inches. Air recirculates through the unit and needs room to do it without pulling from a dead corner.Second do not mount it above anything that generates heat.
A TV a lamp or a gas fireplace. The thermistor on the indoor unit reads the air coming back to it – if that air is artificially warm the unit runs longer than the room actually needs. It is a small inefficiency that compounds across years.Interior wall high up and roughly centered in the room. That is the placement that works in almost every situation.
3. Getting the line set routing wrong

The refrigerant lines need a consistent downward slope from the indoor unit to the outdoor unit – a quarter inch of drop per linear foot is the standard. This is not about refrigerant flow – it is about condensate. Water that forms on the lines needs somewhere to go.Two things cause problems more than anything else here: running the line set too long and kinking it during bending.Most residential mini splits are factory charged for runs up to 25 feet.
Go longer than that and you are into refrigerant charge adjustment territory which requires equipment and certification you almost certainly do not have. Keep the run short. If the layout of your house makes a short run impossible plan for that cost before you buy the unit.Kinking is permanent. Once copper refrigerant tubing is kinked the restriction does not go away when you straighten it. Use a proper tube bender for any turns sharper than a gentle curve.
4. Skipping or rushing the vacuum evacuation
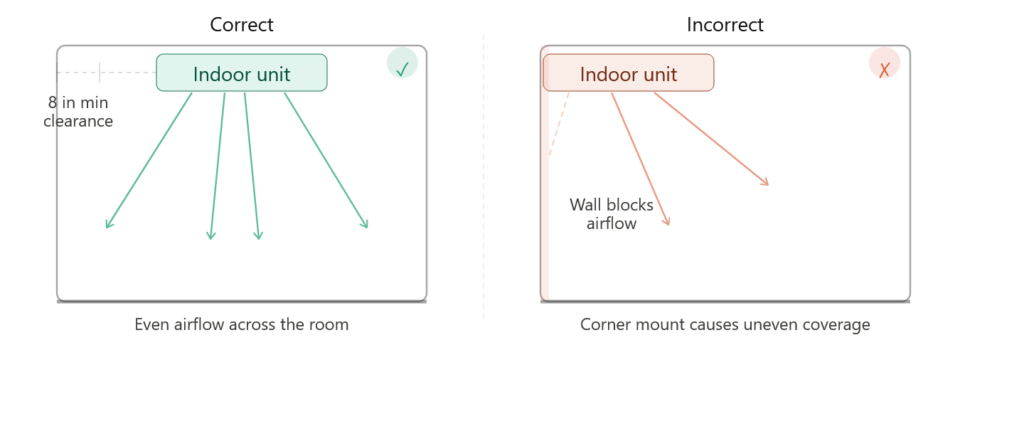
This is the one. Every compressor failure that gets blamed on a defective unit in the first year is more often than not a vacuum evacuation that was done poorly or skipped entirely.Here is what happens when you skip it: air and moisture stay trapped in the line set. Moisture reacts with the refrigerant oil to form acids. Those acids slowly destroy the compressor from the inside. The system runs fine at first. Then it does not.The process: connect a two stage vacuum pump and manifold gauge set to the service ports on the outdoor unit. Pull the system down to 500 microns not 1000.
Once you hit it close the manifold valve shut off the pump and watch the gauge for ten full minutes. The needle should not move. If it rises you have a leak or moisture contamination and need to find it before you go any further. A cheap single stage pump will not reliably pull to 500 microns. A decent two stage pump costs around $80 to $120 and is the single most important tool purchase for this job.
5. Skipping the permit
The permit exists because mini split system installation involves a new dedicated electrical circuit and new circuits get inspected. That is the part people skip and the part that causes the most downstream problems.If something goes wrong an electrical fire or water damage from a failed drain line your homeowner’s insurance will ask whether the work was permitted.
If it was not you may be looking at a denied claim. Manufacturer warranties have similar language. An unpermitted installation gives them a clean reason to walk away from a warranty claim.In most areas the permit is $50 to $150 and the inspection is a 30 minute visit. It is not the obstacle it feels like.
6. Undersizing the wire or misrating the breaker
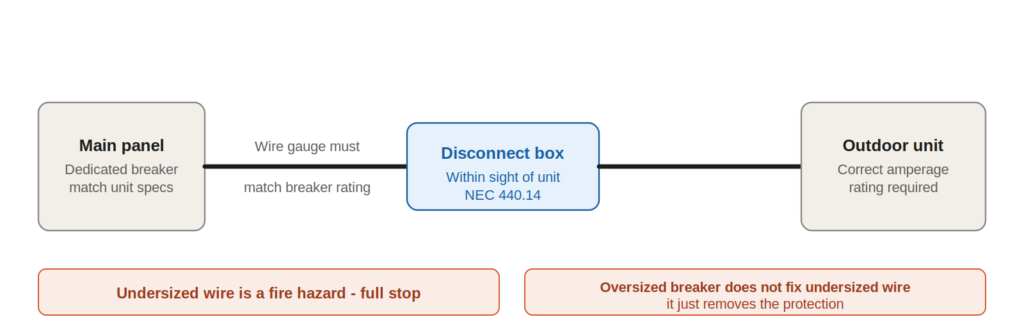
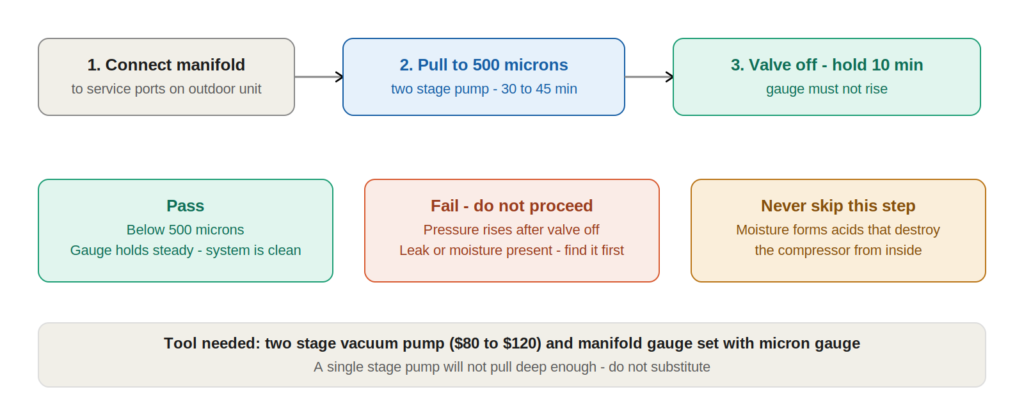
The unit’s installation manual specifies the minimum circuit ampacity and the maximum overcurrent protection. Both numbers matter. Undersized wire is a fire hazard full stop. Oversizing the breaker to compensate for undersized wire does not fix the wire it just removes the protection that was supposed to catch the problem before a fire starts.
The disconnect box near the outdoor unit also needs to be within line of sight of the unit and rated for the correct amperage. NEC 440.14 covers this specifically. If you are not comfortable working in a panel this is the one part of a ductless mini split installation worth hiring out. Everything else on this list is more forgiving.
7.The wall penetration angle
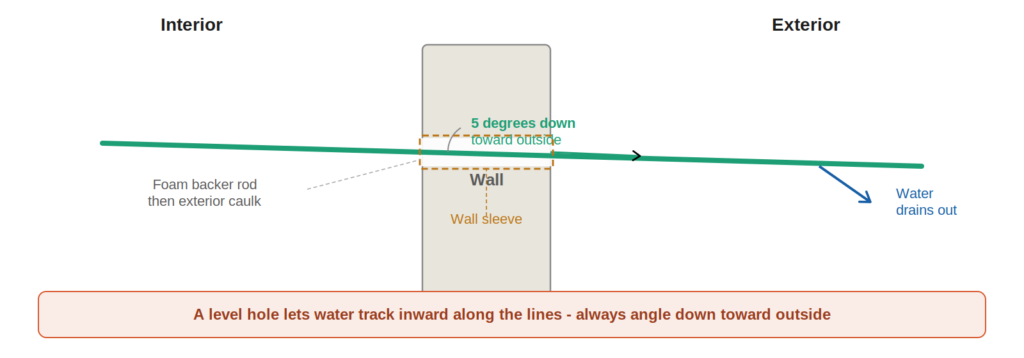
The hole through the exterior wall needs to angle slightly downward toward the outside – about five degrees. This keeps water from tracking inward along the lines during rain. A level hole looks right but behaves wrong.Use a wall sleeve. It protects the copper and wiring from the rough edges of the hole and makes the penetration look finished.
Seal the gap between the sleeve and the wall with foam backer rod first then exterior grade caulk over it. This seal is the only thing between your wall cavity and the outside – pests moisture and air infiltration all come through gaps here.
8. A condensate drain that does not drain
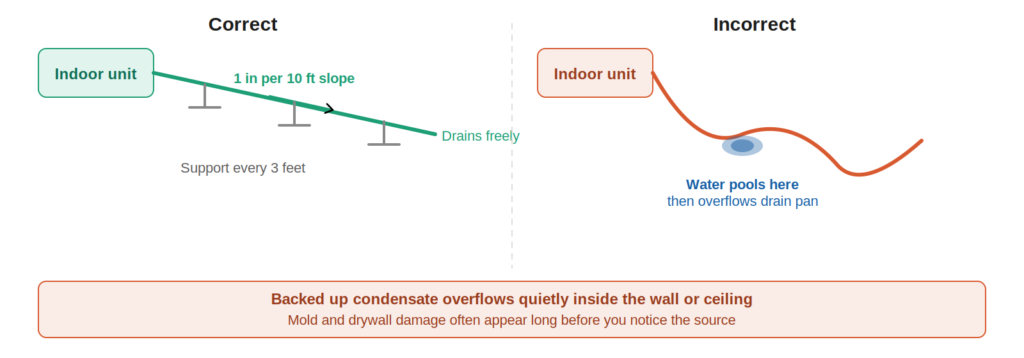
One inch of drop per ten feet is the minimum slope for the condensate drain line. Less than that and you are relying on momentum that is not there.Support rigid PVC drain line every three feet so it does not sag between supports and create a low spot that collects water.
If the drain has to travel upward at any point install a condensate pump. They are $30 to $60 and they work. Fighting gravity with slope alone does not.A backed up condensate drain overflows the drain pan quietly inside the wall or ceiling for a while before you notice it. By then you are dealing with mold and drywall not just a drain fix.
9. Opening the service valves before pressure testing
These two steps are both necessary and the sequence matters. Nitrogen pressure test comes first then vacuum evacuation then you open the service valves. Do it in the wrong order and you risk pulling contaminants into a system that has an undetected leak.
For the pressure test pressurize the line set with dry nitrogen to the pressure your installation manual specifies typically 300 to 500 PSI for R-410A systems.
Hold it for at least 30 to 60 minutes and check all flare connections with soapy water. A leak that does not show at low pressure can absolutely show up at the 450 to 500 PSI operating pressures a heat pump sees in winter.
Once the system holds pressure bleed the nitrogen down to near atmospheric then pull your vacuum. The vacuum removes moisture and confirms the system is clean. Only after a clean vacuum hold do you open the service valves.
One honest note: some manufacturer manuals skip the nitrogen step entirely and only require vacuum. Check your specific manual. If it does not call for nitrogen the vacuum hold test is your leak check – and your micron gauge is the only tool that will tell you if it passed.
10. Touching the refrigerant
R-410A and R-32 – the two refrigerants you will encounter most often in residential mini splits – require EPA Section 608 certification to purchase and handle legally. This is federal law not a suggestion and violations carry fines of up to $44,539 per day per violation.The practical point is this: you almost certainly do not need to touch the refrigerant.
Most residential mini split units are pre charged at the factory for runs up to 25 feet. If your vacuum pulled clean your line set is within the rated length and you open the service valves correctly the system charges itself. That is the design.If your run is longer than the factory charge covers or if you suspect an undercharge after startup call a licensed HVAC tech for that piece specifically. It is typically a short visit and the cost is a fraction of a compressor replacement.
What is realistic for a DIYer
Mounting both units routing the line set cutting and sealing the wall penetration and setting up the condensate drain are all solidly within reach for someone who is comfortable with basic tools and willing to read the installation manual carefully – the actual manual not just a YouTube summary of it.
The vacuum evacuation is learnable: get the right pump, watch the gauge, and do not rush it. The two places worth bringing in a pro: anything involving the main panel and any refrigerant work beyond opening pre-charged service valves. Get those right, and the rest of the job is yours. So are the energy savings.